Tag: James Cameron

  • Fish Tacos With Friends

    Fish Tacos With Friends

    c/o Isabel Kapner
    c/o Isabel Kapner

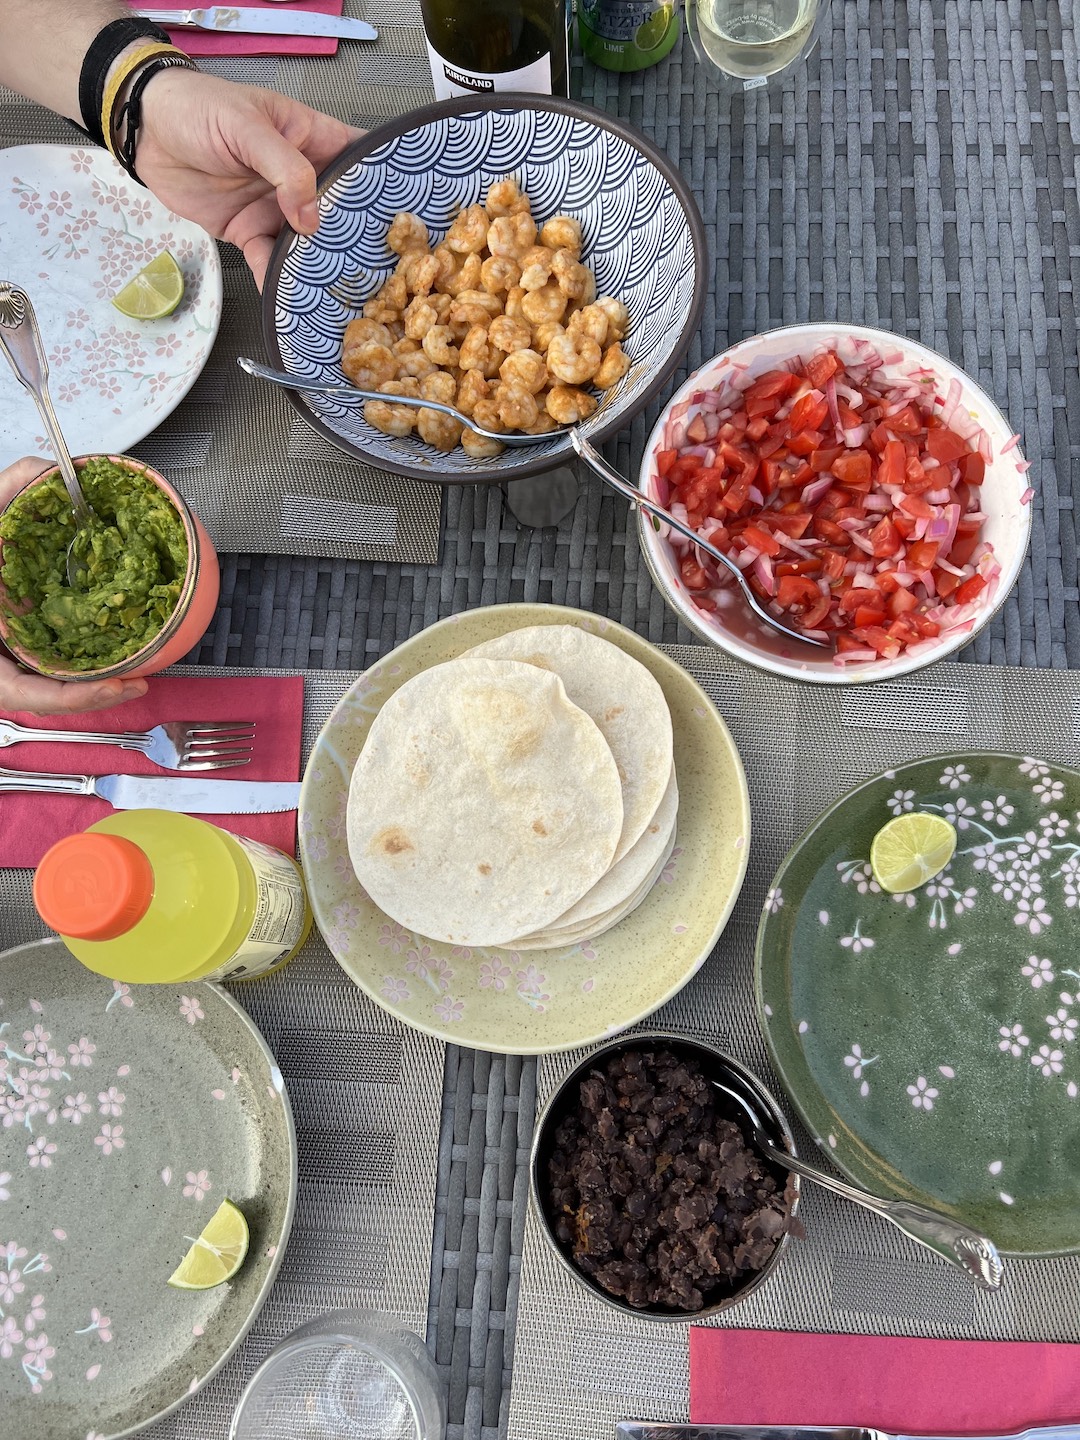
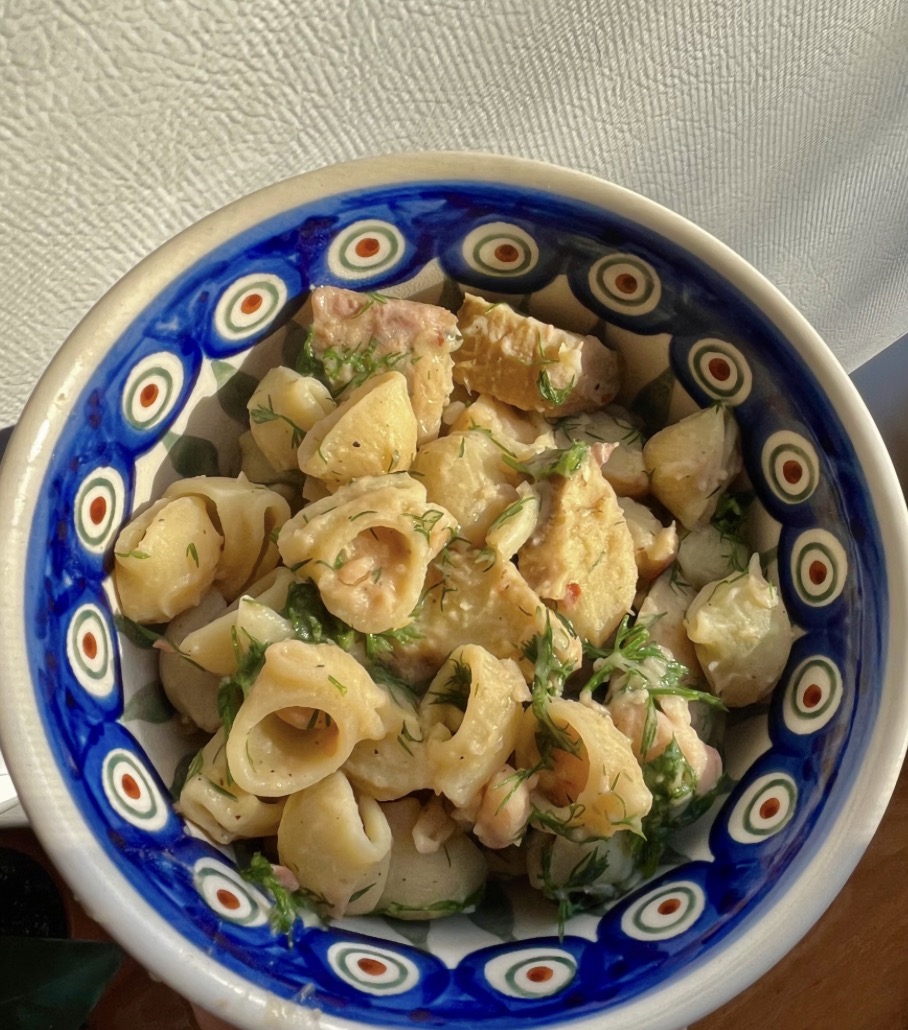
    Take a second and imagine with me. You’re sitting with your favorite people at a table outside, watching the sun begin to set, basking in the deep summer warmth. You’ve just spent the past hour cooking and finally get to sit down, relishing the time spent together and the delicious collaborative meal. That meal is the incredible shrimp tacos that this article hopes to share with you.

    Shrimp tacos are my favorite thing to make with my friends and my family. It’s a very simple meal and anyone, regardless of cooking experience, can help with a step. Maybe it’s because I made these over and over this past summer, but the flavors remind me so much of that perfect August evening. The tomato and avocado mixtures add an incredible freshness and zest, while the beans bring an aspect of warmth, with the spicy shrimp bringing it all together in a wonderful amalgamation of flavors and textures. As it starts to warm up at Wesleyan and summer quickly approaches, these shrimp tacos will allow you to best savor the time left with your friends.

    Fish Tacos for Friends (technically they aren’t fish tacos, but we make sacrifices for the sake of alliteration)

    Ingredients

    Serves 3–4 

    c/o Isabel Kapner
    c/o Isabel Kapner
    • 1 pound shrimp, defrosted and patted dry 
    • 1 can black beans 
    • 2 hearty tablespoons sour cream or Greek yogurt 
    • 3 handfuls cherry tomatoes, quartered
    • 1/2 red onion, diced
    • 2 big avocados, diced
    • 1 pack mini flour tortillas
    • 2 limes 
    • 2 tablespoons olive oil
    • Taco seasoning, tajin, or your spicy and zesty seasoning of choice
    • Salt

    Instructions

    1. In a bowl, toss the shrimp with taco seasoning or with a mixture of cayenne pepper, smoked paprika, and garlic powder. Set aside.
    2. In a second bowl, add the diced avocado, a 1/2 lime’s worth of juice, tajin (to liking), and salt. Loosely mix together.
    3. In a third bowl, add the diced tomatoes, diced red onion, a 1/2 lime’s worth of juice, and salt. Loosely mix together.
    4. Heat olive oil in a pan over medium heat, then add rinsed black beans. Cook for 3–5 minutes until warm.
    5. Add the cooked black beans to a bowl and mash together with the sour cream or Greek yogurt. 
    6. Heat the pan back up to a medium, and add the shrimp. Cook each side for 3–4 mins, until pink. They should curl into a “C” shape when done. An “O” shape means they are overcooked.
    7. While cooking the shrimp, toast or warm your tortillas. 
    8. Cut the remaining lime into slices and put in a bowl.
    9. Assemble: add a layer of the beans, the avocado mixture, and the tomato mixture down the center of each tortilla, and top each one with a few shrimp. Enjoy!

    Issie Kapner can be reached at ikapner@wesleyan.edu.

  • Scrutinizing Skyline Chili

    Scrutinizing Skyline Chili

    c/o Blake Klein
    c/o Blake Klein

    Over spring break, I had yet another mock trial tournament to attend. If you’ve been following my recent articles, you’ll know that the hours of preparation we put into competing comes second to my food exploration of brand-new cities. This time, our competition was in Cincinnati, Ohio, a place I likely otherwise would have not had a reason to visit. We set out for our 11-hour drive, anticipating the wonders of the Midwest.

    Ohio is famously known for being the butt of internet jokes, the birthplace of Lebron James, and the epicenter of Cincinnati chili. Cincinnati chili originated from the culinary exploits of immigrants from Greece, including brothers Tom and John Kiradjieff. In 1922, the pair opened “Empress Chili Parlor” in downtown Cincinnati and served a dish similar to a traditional Greek stew; the unique form of chili combines Mediterranean spices like cloves and cinnamon with chili powder. Today, Cincinnati chili often comes in the form of the classic “3-Way” (yes, that is the real name), which consists of a bed of spaghetti topped with chili and a mound of cheddar cheese. You can even go for a 4-Way or 5-Way by adding onions, beans, or both.

    While many renowned restaurants serve their rendition of the classic 3-Way, including the still-operating Empress Chili Parlor, Skyline Chili is the most famous. The restaurant chain is all over Southern Ohio and is known for its not so secret “secret recipe” that incorporates cloves and cinnamon.

    “[The food] is extremely craveable. Some would even say addictive,” reads their website, describing Ohioans’ apparent adoration for the chili.

    After about 9 hours of driving, my teammates and I had reached the outskirts of Cincinnati and were craving sustenance. Since Skyline Chili was third in a list of the ten best Cincinnati chili places, I decided to stop there, eager to try the mysterious 3-Way. The restaurant itself has a diner-like, homey atmosphere. The kitchen is right in the middle of the seating, so we could watch workers flipping hot dogs and making chili before our eyes. I decided to order the 5-Way and a “Coney,” another renowned dish that consists of a hot dog topped with chili and mustard. The four of us were eager to eat, having gone six hours without food. I could not wait to enjoy Cincinnati’s quintessential dish.

    It was awful.

    The chili was incredibly bland and seemed to have no seasoning. There was no sign of the cloves or cinnamon, let alone salt. It was also very thin and watery, more of a liquid than a chunky stew. To be fair, the waiter mentioned that this was the last bunch of chili, so that may have had something to do with its horrid flavor. The steamed hot dog was similarly bland, and the chili did it no favors. Both were served with an excessive heaping of cheddar cheese—there was practically enough for it to be its own dish. As for its taste, the hot dog was incredibly mild and had a rubbery texture resembling Play-Doh.

    Despite the dramatic let down, I scarfed it down, my stomach not satisfied by the 10  McNuggets from lunchtime. To my demise, the chili gave me the worst heartburn of my life, and I ended up running to the nearby gas station to buy antacids. Needless to say, all four of us went through the eight pack of Tums quickly. I’ll spare you the details on the gas station bathroom that accommodated us.

    Despite my terrible experience at Skyline Chili, I should mention that Ohio’s culinary prowess was not all bad. Although I was too afraid to try any other version of the 3-Way, we did have some very nice meals in Cincinnati proper, including a wonderful breakfast at Waffle House, one of my favorite chain restaurants. However, Skyline’s special chili did not match my expectations. Maybe another location would have been better, maybe this just so happened to be a bad batch, but I digress. If you find yourself in Cincinnati, get your 3-Way at a parlor other than Skyline Chili.

    Blake Klein can be reached at bklein@wesleyan.edu.

  • Matcha Lemon Bars With Blueberry Compote

    Matcha Lemon Bars With Blueberry Compote

    c/o Jordan Scott-Weiner
    c/o Jordan Scott-Weiner

    When it comes to baking, I stick to what I know, which is really just chocolate chip cookies and lemon bars. I gravitate toward lemon bars because I adore the tart, thick filling along with the buttery shortbread crust. Also, it doesn’t hurt that my family has been blessed with a gigantic Meyer lemon tree, which has stood strong in our backyard for as long as I can remember. When I say it’s big, I’m not kidding. This tree always has lemons on it, with what sometimes looks like a hundred plump citrus fruits hanging from its branches.

    As someone who adds lemon to just about anything I make in the kitchen, it really is quite wonderful to be able to step outside to grab one without having to account for them in my grocery shopping list. Plus, these aren’t just any old lemons, they’re Meyer lemons. They’re sweeter than your regular lemon, which is believed to be because they are a cross between a lemon and a mandarin orange (don’t quote me on that, though).

    Once I returned home for spring break, I was eager to satiate my craving and get to baking these bars. However, I wanted to do something different from usual, so I went off-script and added some embellishments. I knew I wanted to add some sort of fruit compote, and I had these gorgeously chubby blueberries sitting in my fridge. Then I was considering how I could make the crust more interesting—maybe a herb like thyme? However, I decided that might be a little too overwhelming with the flavors of the blueberry and the lemon. I suddenly remembered this matcha latte with strawberry purée I had had at a local boba shop, and I thought that matcha could make sense with the blueberry flavor while adding a fun pop of color, so I ran with it. Now, enough babbling. Here is a very easy recipe that will look and taste like you did something far more impressive.

    Ingredients

    Matcha shortbread crust:

    • 1 cup unsalted butter, melted
    • 1/2 cup granulated sugar
    • 1/2 teaspoon salt 
    • 2 cups and 1 tablespoon all-purpose flour
    • 3 teaspoons matcha

    Blueberry compote:

    • 1 cup blueberries (or fruit of choice)
    • 1/4 cup water 
    • Honey to taste 

    Filling:

    • 2 cups granulated sugar
    • 6 tablespoons all-purpose flour
    • 6 large eggs
    • 1 cup lemon juice (about 6 lemons)
    • Confectioner’s sugar to taste

    Instructions

    Crust: 

    1. Preheat the oven to 325˚ F and line a 9 x 13-inch baking pan with parchment paper so that it is hanging over the sides of the dish.
    2. In a bowl, combine the butter, sugar, and salt.
    3. Sift the flour and matcha into the bowl.
    4. Mix fully and add to the baking dish.
    5. Bake for around 22 minutes, until the crust is slightly golden. Once it is out of the oven, use a fork to pierce holes in the crust, which will help the compote and filling stick.

    Compote: 

    1. While the crust is baking, add the blueberries (or your fruit of choice, strawberries would also work well) and water to a saucepan on medium heat.
    2. Let it simmer until the berries cook down into a jammy consistency, around 15 minutes.
    3. Depending on the ripeness of the fruit and desired sweetness of the compote, add honey.
    4. Spread the compote evenly onto the crust and let it cool for at least 15 minutes, but 30 minutes or more is optimal so when you add the lemon filling there will still be clear layers.

    Filling: 

    1. In a bowl, sift the sugar and flour together.
    2. Add the eggs, also through the sieve, which should help prevent the eggs from separating during the baking process. You might as well keep the sieve on top of the bowl when adding the lemon juice to stop seeds from sneaking their way in.
    3. Whisk all the ingredients together, and pour the mixture on top of the compote and crust.
    4. Bake the bars at 325˚ F for 22–26 minutes, or until the filling no longer jiggles.
    5. Let cool for a couple of hours.
    6. Once ready to serve, lift the parchment paper to remove the bars from the pan, dust the top with confectioner’s sugar (which conveniently covers any compote that is visible on the surface), and slice bars into squares, being sure to clean your knife in between so that the layers are as clear as possible. The bars should last in the fridge for a week. Enjoy!

    Jordan Scott-Weiner can be reached at jscottweiner@wesleyan.edu.

  • Artichoke and White Bean Pasta: Cooking With Chef G

    Artichoke and White Bean Pasta: Cooking With Chef G

    c/o Gemmarosa Ryan
    c/o Gemmarosa Ryan

    Oh, the jarred artichoke! What a wondrous creation. I would eat these bottled beauties every day if I could. But, as one grows older and wiser, one realizes—to much dismay—that it is, indeed, dangerous to have too much of a good thing. So, when I allow myself a jar, it’s with both giddiness and caution that I ask myself: How can I best showcase these bleeding green hearts? This recipe comes from one such experiment, which, to much delight, turned out to be incredibly fruitful. Paired with a creamy white bean, fresh dill, and the bright punch of a whole lemon, this artichoke pasta will no doubt please all the palates it graces. 

    Ingredients

    Serves 2

    • 1 can artichoke hearts (preferably in olive oil)
    • 1 can cannellini beans
    • 3 cloves garlic
    • 1 lemon, for both zest and juice
    • 1 handful dill 
    • 1 teaspoon red pepper flakes
    • Salt and pepper 
    • Pasta of choice (Rigatoni or anything tubular works best)

    Instructions

    1. Bring a pot of salted water to a boil.
    2. Drain and rinse cannellini beans. Set aside. 
    3. In a large saucepan, heat 2 tablespoons olive oil over medium heat (use oil from the jar if artichokes are oil-packed)
    4. Quarter the artichoke hearts into bite-sized pieces, and thinly slice three cloves of garlic.
    5. Add artichoke hearts to the pan and cook undisturbed for 2-3 minutes. 
    6. Add in garlic and red pepper flakes, cooking for 1-2 minutes until fragrant. 
    7. Turn heat to medium-low, and deglaze the pan with lemon juice. 
    8. Add in cannellini beans, seasoning with salt and black pepper. Cook for another 3-4 minutes. 
    9. When the pasta is cooked, add in lemon zest and chopped dill.
    10. Add cooked pasta to the mixture along with some reserved pasta water until the sauce becomes emulsified. 
    11. Top with parmesan and some more fresh lemon zest and dill. 

    Gemmarosa Ryan can be reached at gryan@wesleyan.edu

  • It’s Giving Garlic: Five Ideas for Culinary Creativity That Would Make Vampires Flee

    Garlic may be my favorite ingredient. There is truly no ingredient I use more and no ingredient I appreciate more. There are few dishes that garlic cannot elevate and transform. Here are my five favorite forms of garlic and how I incorporate them into my meals. 

    #1: Jarred Minced Garlic

    As a busy college student, jarred minced garlic from Weshop is my fridge superhero. Usually less than $5, the pre-minced, vinegar-based staple is such a convenient way to add garlic to all my favorite savory dishes. Though the flavor is much less pungent than fresh garlic, it acts as an incredible substitute for those who do not want to spend their time finely chopping the fresh kind. 

    The vinegar base gives it a much softer consistency than chopped garlic, and as such it’s easily spreadable. You can toss a generous spoonful of jarred minced garlic (more than you think you need!) onto any dish you prepare on a pan over the stovetop for a wonderful, easy flavor addition. Some of the best uses of jarred garlic are: 

    • In any pan-fried chicken dish
    • In scrambled eggs
    • Sautéed with leftover vegetables (think onion, mushrooms, spinach, etc.) and put into a grain bowl or tomato sauce base
    • A spoonful as a topping on reheated pizza

    #2: Chili Garlic Crunch 

    This is by far my favorite spicy addition to any meal. Crunchy dried onion and dried garlic bathe in a chili-infused olive oil in this jar of spicy goodness, and it’s available at Trader Joe’s for only $5. There are also many more gourmet options available at your local grocery store, including the Momofuku Chili Crunch ($10.39). Non-Trader Joe’s options tend to be pricier and spicier, so choose with discretion. Some of the best uses of chili garlic crunch are: 

    • In avocado toast
    • Atop fried eggs
    • Sprinkled amidst fried rice
    • On top of any roasted veggie
    • Even with a cold bowl of vanilla ice cream

    #3: Microplaned Fresh Garlic

    Though this type of garlic requires significantly more prep and equipment (a microplane) than my other favorites, its flavor is unparalleled. To quote my friend Ava, “There is rarely a place where fresh garlic shouldn’t be.” I agree with this wholeheartedly. Microplaned garlic does require peeling garlic cloves and then microplaning them, but the prep is very worthwhile for the immense flavor payoff. To make peeling garlic cloves even easier, use the side of your knife to press down, crushing the garlic and releasing the shell. Microplaned garlic can be used in the same ways as minced garlic, such as sautéeing or as a soup starter. Because of its paste like consistency, some of the best uses of microplaned fresh garlic are: 

    • In a quick aioli
    • In a pesto sauce
    • In a fresh, punchy salad dressing

    (Aside from being garlic’s best friend, a microplane is very useful for zesting citrus as well.)

    #4: The Classic Fresh Chopped Garlic

    If I had endless time to cook, I would be crushing and dicing my garlic every single time I used this wonderful allium. Crushing the garlic with the side of your knife not only increases the ease of peeling the clove, but also helps release the flavor. I find that finely chopping garlic can also be a therapeutic task and I love the aroma of garlic clinging to every surface of my kitchen. Fresh minced garlic has an incredibly strong flavor and is an unparalleled edition to every dish. Some of the best uses of classic fresh chopped garlic are: 

    • In a tomato sauce
    • In a curry
    • In a marinade

    #5: Garlic Powder

    Though this is my least favorite form of garlic, garlic powder still holds a special place in my heart and my pantry. Garlic powder is the easiest way to add garlic to a dish and does its job well. It’s not the most exciting or flavorful form of garlic, but is a pantry staple nonetheless. One of the best uses of garlic powder is in a BBQ chicken spice rub like this one: 

    1. Combine a few spoonfuls of brown sugar with generous sprinkles of garlic powder, smoked paprika, cayenne pepper, onion powder, and salt/pepper
    2. Put your chicken in the fridge anywhere between 30 minutes to a few hours to let the rub really sink in
    3. Add to a hot pan and cook for 3 to 5 minutes on each side

    Though garlic powder is not the star of this rub, it adds great flavoring and provides a lovely addition to the spicy chicken

    If you love garlic as much as I do, feel free to submit your favorite garlicky recipes to The Argus or Food for Thought (@wesfoodforthought on Instagram) to be featured!


    Issie Kapner can be reached at ikapner@wesleyan.edu.

  • The Art of the College Breakfast

    The Art of the College Breakfast

    c/o Honor O'Donnell
    c/o Honor O’Donnell

    I am a proud breakfast enthusiast and snob. Whether I make it the night before or the morning of, enjoying my breakfast with a cup of coffee is a routine I try to maintain even when I’m the busiest. My days of running half asleep to Pi Café for a banana or bagel are a distant memory now that I live in a program house with a full kitchen. To those who insist that they either are never hungry in the morning, don’t wake up early enough, or are simply too busy to eat breakfast every morning, I have one thing to say: you just haven’t mastered the art of it. Luckily, I have three recipes that will change your mind. Most can be made ahead, and some can even be made with borrowed ingredients from Usdan. Leave the days of sitting through your 8:50 with a grumbling stomach in the past forever.

    Chia Seed Pudding

    Ingredients

    • 1/2 cup yogurt
    • 1/2 cup almond milk
    • 2 tablespooons chia seeds
    • 1 teaspoon cinnamon
    • Sweetener of choice (I typically use honey)
    • Optional: 1 scoop of protein powder (I use Orgain vanilla or RYSE cinnamon toast)
    • Optional: toppings, e.g. berries, nuts, shredded coconut, nut butter, granola

    Instructions

    1. Add yogurt, almond milk, chia seeds, and cinnamon to a mason jar, mug, solo cup (tried and true), or literally any other container you have on hand. Mix until combined. 
    2. Add protein powder if using. 
    3. Cover and refrigerate overnight. 
    4. Add toppings and sweetener before eating. 

    Note: Adding frozen berries before letting the pudding sit overnight will allow the berries to melt, resulting in a delicious jammy topping!

    Protein-Rich Overnight Oats

    Ingredients

    • 1/3 cup rolled oats (instant works too, but will be mushier)
    • 1-2 tablespoon chia seeds
    • 1/3 cup milk of choice
    • 1/3 cup Greek yogurt or cottage cheese
    • 2 tsp cinnamon
    • 1 banana, microwave if frozen
    • Berries, nut butter, and sweetener for topping
    • Optional: 1 scoop protein powder, powdered peanut butter, or cacao powder for flavoring

    Instructions

    1. Add oats, chia seeds, milk, Greek yogurt, and cinnamon to a container. Mix until well combined. 
    2. Mash in the banana with a fork. 
    3. Add in protein powder or other flavorings if using and mix. 
    4. Cover and refrigerate overnight. 
    5. Add toppings and sweetener before eating. 

    Microwave Sweet Potato

    This one might be a little controversial, but it’s my current breakfast obsession for its ease, efficiency, and versatility. I usually enjoy my sweet potatoes with savory toppings like fried eggs, guacamole, and hot sauce, or I go for a sweeter taste and include yogurt, fruit, and drizzled honey. 

    Ingredient

    • 1 sweet potato 
    • Toppings of choice (yogurt, eggs, nut butter, honey, guacamole etc.)

    Instructions

    1. Poke 3–4 holes throughout the potato with a fork. 
    2. Microwave for 5–6 minutes, turning it over at the halfway mark. Check to see if it’s fork tender – if a fork or knife doesn’t slide in easily, continue microwaving in 30-second intervals until it does. 
    3. Cut open and enjoy with toppings. 

    Honor O’Donnell can be reached at heodonnell@wesleyan.edu

  • A Food Editor’s Take on the Costa Rican “Casado”

    A Food Editor’s Take on the Costa Rican “Casado”

    c_o Lewis Woloch Casado Large
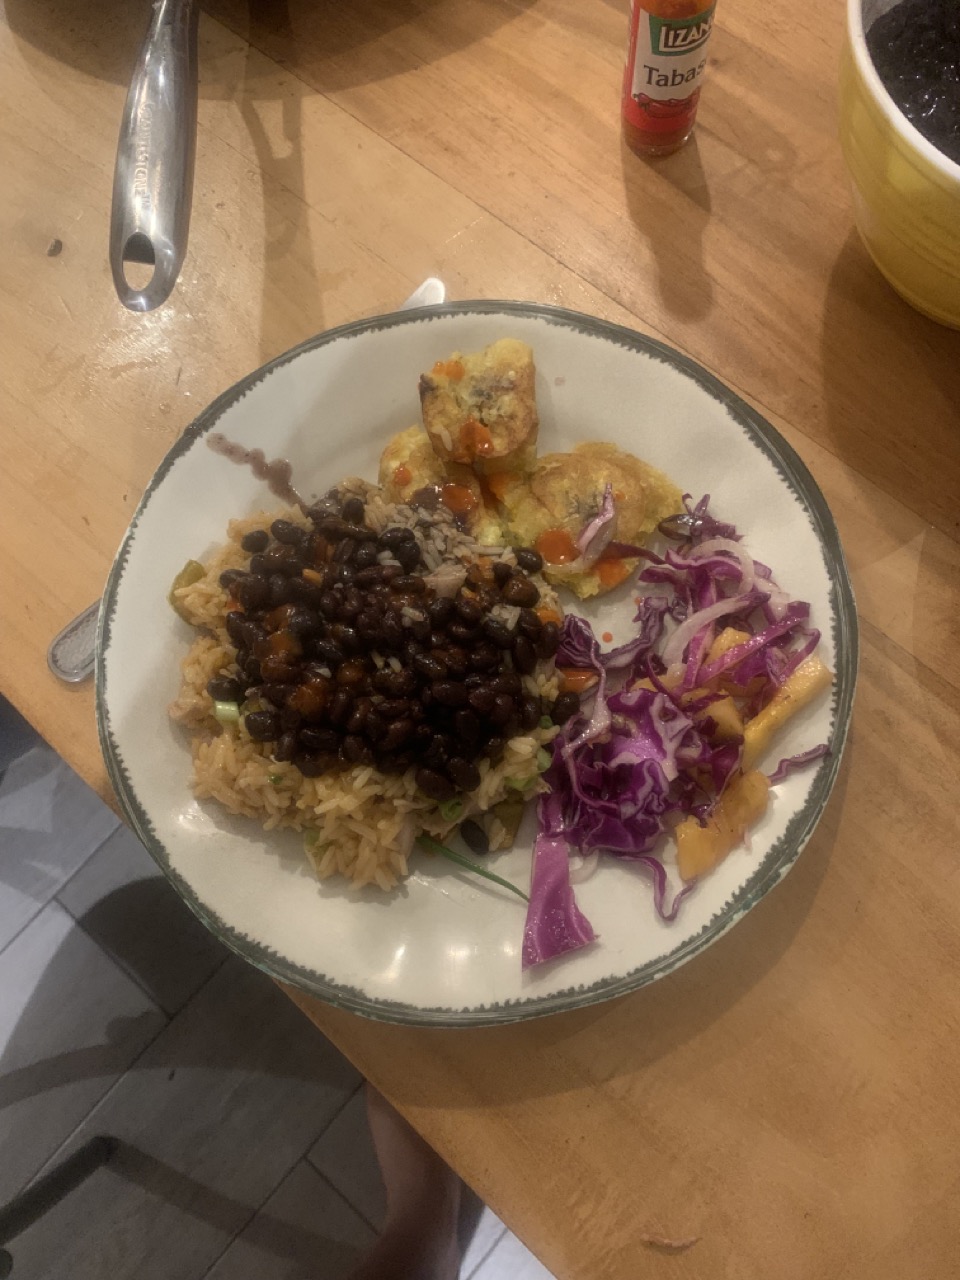
During my 10-day vacation in Costa Rica, I probably consumed 10 pounds of rice, 10 pounds of beans, and 50 million plantains. That’s an exaggeration, but as a voracious lover of Latin American cuisine, I couldn’t help but gorge myself on the delicious bounties that the home country of the casado had to offer. The casado is a dish that every restaurant has, but it’s hard for the home cook to replicate since there seems to be no set way to make it. The basic parts are rice, beans, some kind of meat, a salad, maybe some avocado, an egg, and if you are lucky, a few crispy, sweet plantains.

    On the last night of my wonderful spring break vacation, I attempted to make my own casado, cutting a few corners in terms of traditional Costa Rican ingredients but remaining, for the most part, true to the hole-in-the-wall restaurants that we frequented. I did change the chicken section, because when I actually cooked the meal, I had only bone-in drumsticks on hand. They made a great broth, but all I could do with the meat was shred it and mix it in with the rice. Boneless chicken thighs are easier to deal with and very flavorful, so I suggest using those over any other cut of chicken. I made the rice and beans according to my own tastes and the sauces I had available, but substitutions can be made in terms of ingredients and method. For example, I kept the beans intact, but they could easily be refried as well. Finally, the toppings are at the discretion of the cook, but the red cabbage texturally complements the soft rice and beans, and the avocado and plantains are just damn tasty. The recipe below is the result of my efforts.

    Casado de Pollo

    Ingredients

    Serves 6-8

    Rice:

    • 3 cups of medium-grain rice, rinsed until the water runs clear
    • 2 green bell peppers, diced
    • 1 large onion, chopped
    • 1/2 cup ranchera sauce (a common staple in Costa Rica, a smooth salsa can be substituted)
    • 4–5 cups of chicken broth
    • Salt and pepper, to taste

    Beans:

    • 2 cloves garlic, finely chopped
    • 1 tablespoon paprika
    • 2 teaspoons cumin
    • 2 tablespoons Salsa Lizano (worcestershire, soy, or lemon with a bit of salt can be substituted)
    • 3 cans black beans, plus the liquid

    Chicken:

    • 6 boneless, skin-on chicken thighs
    • Paprika, cumin, chipotle powder, salt, and pepper to taste
    • 3 tablespoons olive oil, plus some extra for the salad

    Accompaniments:

    • 1/4 cup chopped cilantro
    • 3 large, sweet plantains (they should have black spots all over)
    • 2 avocados, thinly sliced
    • 1 small head of red cabbage, shredded
    • Lime wedges
    • Your favorite hot sauce (habanero goes nicely)

    Instructions

    1. Create a spice rub in a small bowl for the chicken, mixing with about a tablespoon of olive oil to create a loose paste. Rub all over the chicken thighs and let rest until you lose patience. (Or if you want to maximize flavor payoff, anywhere from 2 hours to overnight).
    2. In the meantime, get the rice started by sautéeing the peppers and onions in a wok, steel pan, or any large cooking vessel with a bit of olive oil over medium-high heat. 
    3. Cook the veggies until translucent and a few onions are starting to brown, salt heavily, and then add the washed rice. Let the rice fry in the pan for a minute or two, then add in the ranchera sauce and stir to coat all the grains.
    4. After stirring, add chicken broth, about a cup at a time. You may want to add more at first, just to make sure none of the rice burns. After the first few cups of broth start to boil, lower the heat, and continue adding more broth when the last batch has dissipated.
    5. Keeping an eye on the rice, heat up another tablespoon of oil in a skillet (cast-iron works here, but not for the rice) and then add the chicken, skin side down. Cook over medium heat to avoid splattering and flip after five minutes, making sure the skin has gotten crispy.
    6. While the chicken and rice cook, start the beans by sautéeing the garlic in a small pot with a bit of olive oil. Cook until golden brown, being careful to not burn, and then add the rest of the bean ingredients, making sure to stir thoroughly to combine everything. Lower the heat and stir every few minutes to make sure the beans aren’t sticking. 
    7. Once the chicken is cooked through, transfer it to a cutting board and chop it into bite-size pieces. The rice and beans should be finished around the same time. Add the chicken to the rice to heat it up again. 
    8. Use the chicken skillet to fry your plantains; the sweet ones need some olive oil (about 1/4 cup or a little less) and should be sliced into 1-2 inch circles and fried till dark brown.
    9. Arrange the chicken, rice, beans, and plantains on a large plate. In a bowl, mix the cabbage with a drizzle of olive oil and a pinch of salt and find a nook to nestle the light salad, preferably next to the rice. Top with more lime juice, cilantro, avocado, and hot sauce. Dig in (eat slowly to avoid severe heartburn, something I unfortunately did not do).

    Lewis Woloch can be reached at lwoloch@wesleyan.edu.

  • Trend Testing: Chopped Bagel

    Trend Testing: Chopped Bagel

    c/o Ava Becker
    c/o Ava Becker

    As a talented doom-scroller and longtime foodie, I spend a fair amount of time watching food content on social media. I am a food trend skeptic, and yet, every once in a while I find myself curious to try a bizarre recipe that I find online. This curiosity struck when, last Saturday afternoon, I began to crave a good bagel. Weshop provided me with my essentials, including Philadelphia cream cheese, cucumber, tomato, red onion, and lox, and then, feeling creative, I decided to attempt one of the food trends that has been circulating my feed.

    Enter the chopped bagel. As my bagel was toasting, I diced my vegetables into small pieces, and then mixed in a healthy amount of cream cheese and lox. As I combined this all, though, I started to feel a sense of shame. Why mess with such a timeless classic? Who am I to think I can improve what has already reached perfection? After assembling the bagel with a healthy amount of salt and pepper, I took a bite and realized that this variation of the bagel is interesting not in its flavor, but rather in its take on the typical bagel-eating experience. The magic of the chopped bagel lies in the structure: no topping fallout, no uneven distribution of flavor. Every bite contains every element, creating the most pleasant and effortless balance of texture and flavor. The joy of this trend is that it is easy to get creative with it! Try your favorite sandwich or salad in chopped form; it may be delicious. All you need is to follow the instructions below with any combination of deli meat, vegetables, and some sort of dressing or spread. 

    Chopped Bagel

    Ingredients

    • 2–3 cucumber slices
    • 4 cherry/grape tomatoes or 2 slices larger tomato
    • 1 thick slice red onion
    • 1 bagel, toasted
    • 2–4 ounces cream cheese
    • 3–4 thin slices Nova lox
    • Capers
    • Salt and pepper

    Instructions

    1. Dice all vegetables while the bagel is toasting, using a large knife. You can chop up each one individually, but if you want to do it like the professionals on TikTok, arrange the cucumber, tomato, and onion in a pile and run your knife back and forth, rotating the whole mess as needed. 
    2. Incorporate the cream cheese and lox; the lox can be placed on top of everything in the first step as well, but the cream cheese should be placed in small dollops around the whole mixture (which should be quite mixed up already). Once everything seems well mixed and chopped into small pieces, season with salt, pepper, and capers, and chop for one more minute, until your arm hurts. 
    3. Spread mixture generously onto toasted bagel. This can be done by using the bagel half itself to push the mixture onto the other bagel half, which is another TikTok hack. And don’t worry if your cream cheese-lox concoction is spilling out of the bagel; this is expected, and whatever spills out can be licked up!


    Ava Becker can be reached at abecker@wesleyan.edu.

  • Tentacle-izing Tapas: An Exciting and Affordable Trip to El Pulpo

    Tentacle-izing Tapas: An Exciting and Affordable Trip to El Pulpo

    “Oh El Pulpo, I adore thee!” reads one Yelp review for this restaurant. For its fresh, delicious tapas and peaceful environment, El Pulpo does warrant adoration. My love for this small restaurant, tucked into the Main Street Market past Perk on Main, comes from its high quality and exciting, yet affordable, dishes. This tapas bar was the perfect place to celebrate one of my best friends’ 21st birthday. They offer an array of vegetable, seafood, and meat tapas, as well as an expansive list of general entrees and a few desserts, all to be enjoyed in El Pulpo’s white tablecloth, soft jazz music type of environment. 

    Entranced by their “3 for $35 tapas” deal on Mondays and Wednesdays, my party of five ordered six tapas for our celebratory dinner. We ordered the Brussels sprouts salad for $14, the ensalada de remolacha (beet salad) for $12, an artichoke dish I cannot find on their online menu, the tuna tartare for $15, gambas organicas a la plancha (Shrimp over Chickpeas) for $16, and the restaurant’s namesake dish: pulpo a la parrilla (grilled octopus) for $17. The birthday girl is pescatarian, so we stayed away from meat dishes. We also ordered two glasses of wine (one for the birthday girl, of course), at $8 each, bringing our total to $111 with tax and tip.

    I was pleasantly surprised by the innovation and excitement of the Brussels sprouts salad. Shaved Brussels sprouts are mixed together with Parmesan and black truffle, contorted into a tall cone shape and placed on top of a thin rectangle of crispy risotto. They are accompanied on the plate by a separate zig-zag drizzle of a mystery yellow sauce. We quickly dismantled and divided this geometric plating between the five of us. As I often feel with any dishes at upscale restaurants that incorporate truffle in their menu, the extravagant addition was insignificant and unnecessary. Aside from my repeated distaste for truffle over-usage, this dish was incredibly enjoyable. It had everything a Brussels sprouts dish needs. It brought freshness, acidity, and exciting textures to an otherwise overdone bistro dish. The crispy risotto complimented the crunchy, fresh, acidic Brussels sprouts mixture, contributing to an amalgam of textures. One of my friends mentioned that some sort of heat, possibly wasabi cream, would act as a great addition to this dish, a comment I agree with. It was definitely my favorite dish of the night, but I have to deduct points for the unnecessary truffle. 9.5/10

    c/o Isabel Kapner
    c/o Isabel Kapner

    The artichoke tapas were delicious, with a wonderful mixture of warmth, tang, and sweetness. Roasted artichoke hearts sit in a pool of tomato sauce and are topped generously with goat cheese and something reminiscent of a salsa verde. There was a subtle acidity and a sweetness in this dish, likely from the tomato sauce. The goat cheese added another great dimension to the already great combination of flavors. 9/10. 

    The ensalada de remolacha was a simple yet cohesive dish: a bed of mixed greens with chopped beets and asparagus lightly bathed in a vinaigrette topped with goat cheese. The beets were perfectly cooked, and none of the flavors overpowered each other. A more generous serving of goat cheese atop this salad would have been nice. 9/10.

    I had never had shrimp and chickpeas together before, but after trying the gambas organicas a la plancha, I can appreciate the pairing. Three buttery shrimp were placed atop a blended chickpea mixture in this rich appetizer. This dish was simple and could have benefited from the addition of a subtle spice, but was well done nonetheless. 8.5/10.

    The Tuna Tartare was fresh and tangy, but the sauce drowned out the flavor of the tuna and prevented it from really coming through. The yucca chips were a fun addition to a typically basic tartare combination of chopped tuna over avocado. 8/10.

    c/o Isabel Kapner
    c/o Isabel Kapner

    In El Pulpo’s namesake dish, grilled octopus was served over chopped asparagus, chickpeas, and tomatoes. The octopus was buttery and tender—simply delicious—with nothing threatening its flavor from coming through. The combination of chopped ingredients underneath the octopus felt unrelated and did not act as a relevant addition to the octopus itself. 8.5/10.

    6 tapas for 5 people at $14 per person is an incredible deal. Overall, the food was fresh, and the flavors were great. I would recommend El Pulpo to anyone who wants to dress up, go to a nice restaurant, and eat innovative and exciting food with high-quality ingredients. Definitely order the Brussel sprouts salad if you have the chance.

    Atmosphere: Relaxed yet elegant.

    Noise Level: Low

    Recommended Dishes: Brussels salad, gambas orgánicas a la plancha, pulpo a la parrilla, artichoke salad, tuna tartare. 

    Price: $$ ($14 per person)

    Open: Monday to Sunday, hours vary per day. 

    Reservations: Not needed on weekdays, encouraged for larger parties on weekends. 

    Website: www.elpulpotapasbar.com

    Isabel Kapner can be reached at ikapner@wesleyan.edu.

  • Banana Bread Blunders: Baking From the Heart

    Banana Bread Blunders: Baking From the Heart

    c/o Chantal Dunn
    c/o Chantal Dunn

    Banana bread is among the most nostalgic baked goods. Every family has their recipe, but absolutely no one can beat the way your own mom makes it. Recently, I attempted three banana recipes: peanut butter chocolate chip banana bars, gluten-free banana bread, and the holy grail: my mother’s banana bread recipe. As a consequence of measuring with the heart (as opposed to tablespoons), I made some pretty avoidable baking blunders while recipe testing. However, when you accurately follow these recipes, they are wildly delicious! 

    Peanut Butter Chocolate Chip Banana Bars

    (Alternatively dubbed the “Zoe bars” as an ode to the friend who showed me this recipe)

    Ingredients

    • 3 ripe bananas, mashed
    • 1 cup peanut butter  
    • 1/3 cup almond flour (can be substituted 1:1 for all-purpose flour)  
    • 1/3 cup honey 
    • 1 egg
    • 1 teaspoon cinnamon
    • 1 teaspoon baking soda
    • 1 teaspoon salt
    • 1 cup or 240 grams chocolate chips (plus more for garnish)

    Instructions

    1. Preheat oven to 325°F.
    2. Line an 8”x8” pan with parchment paper.
    3. To mashed bananas, add peanut butter, almond flour, honey, egg, cinnamon, baking soda, and salt. Stir until well-mixed. (If you have particularly large bananas, add 2–3 tablespoons extra flour. The batter should be runny, but not too liquid.)
    4. Bake for 25 minutes, until a toothpick comes out clean.
    5. Sprinkle flaky salt on top while still hot.
    6. Let cool completely before slicing and digging in.

    Bake-At-Your-Own-Risk Notes

    There are health benefits to almond flour, but I use regular flour because it’s what I have on hand. If you have a particularly sweet tooth, do not be afraid to go heavy on the honey. (I usually add 2 tablespoons more.) 


    c/o Chantal Dunn
    c/o Chantal Dunn

    My Mom’s Banana Bread

    Many have tried, but none have succeeded in dethroning her title of Banana Bread Queen.

    Ingredients

    • 1 and 1/4 cups sugar
    • 1/2 cup butter, softened 
    • 2 eggs
    • 2 cups very ripe bananas, mashed
    • 1/2 cup milk 
    • 1 teaspoon to 1 tablespoon vanilla (whatever your heart desires)
    • 2 and 1/2 cups all-purpose flour
    • 1 teaspoon baking soda
    • 1 teaspoon salt
    • Optional: 1 cup chocolate chips or chopped nuts 

    Instructions

    1. Preheat oven to 350°F.
    2. Mix sugar and butter until combined, as fluffy and airy as possible.
    3. Add eggs, bananas, milk, and vanilla to batter and mix until smooth.
    4. Stir in flour, baking soda, and salt—be careful to not over-mix the batter!
    5. Add chocolate chips or nuts, if using.
    6. Grease the bottoms of the pans only.
    7. Baking time varies; check to see if a toothpick can go cleanly in and out.

    Note that the batter will fit in two 8 and 1/2” by 4 and 1/2” loaf pans, one 9” x 5” pan, or a muffin tin. 8” loaves should bake for around 1 hour. 9” loaves should bake for around 1 hour 15 minutes. Large muffins should bake for around 45 minutes. Small muffins should bake for around 20 mins.

    Bake-At-Your-Own-Risk Notes

    You can go over the cup amount of bananas! Use 4–5 large bananas, according to my mother, and fully browned bananas are honestly ideal—the softer and sweeter they are, the better. You can also substitute regular milk for buttermilk to make your bread softer and fluffier, and optionally add cinnamon to the batter for a slightly spiced flavor.

    Going Gluten-Free

    • Substitute regular flour for gluten-free flour at a 1:1 ratio. (My aunt recommends Bob Red Mills’ gluten-free flour.)
    • Gluten-free recipes tend to require more moisture, so go heavier with the milk or bananas.
    • Gluten-free flours can have a slightly different flavor, so feel free to go heavy on the vanilla or cinnamon.
    • Mix the batter for slightly longer to fully incorporate the gluten-free flour.
    • Increase the baking time to account for the extra moisture added to in the batter. Don’t be afraid to bake slightly beyond when the toothpick comes out clean, this will ensure your bread will hold its light and fluffy texture once cooled!

    Chantal Dunn can be reached at cadunn@wesleyan.edu.