Tag: James Cameron

  • Snow-conut Macaroons: Recipe by Hope Cognata ’28

    Snow-conut Macaroons: Recipe by Hope Cognata ’28

    c/o Hope Cognata

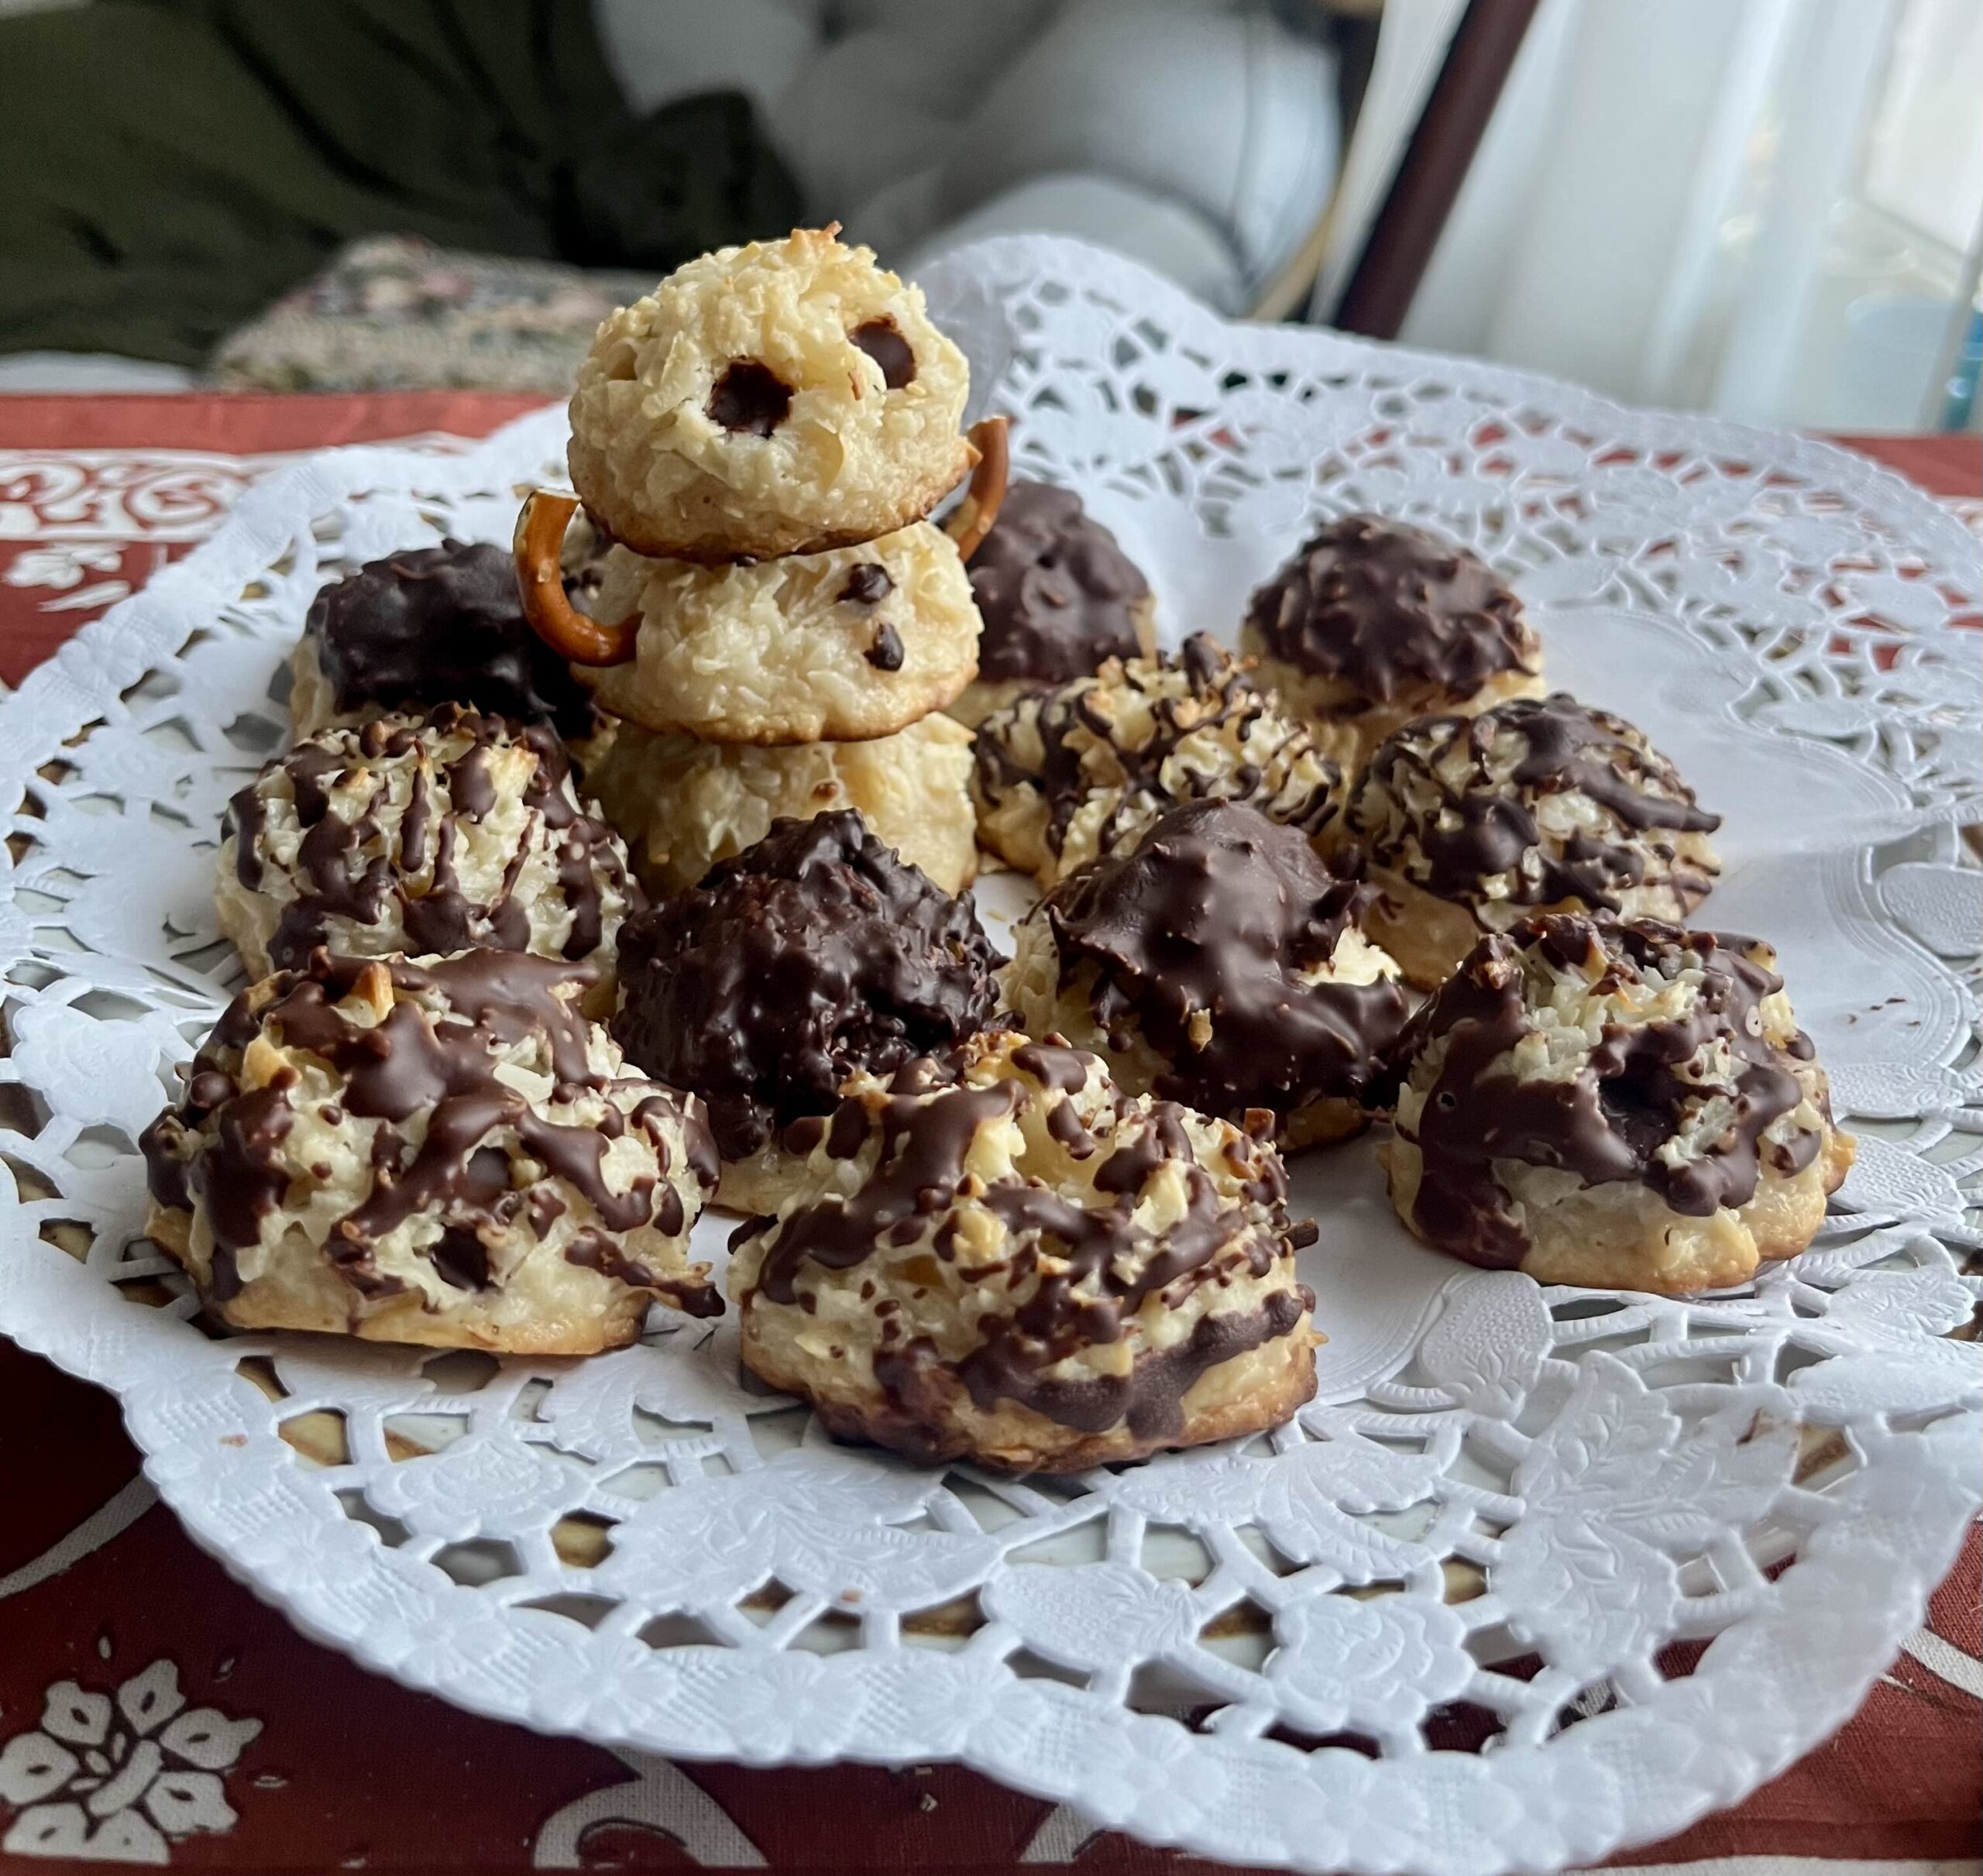
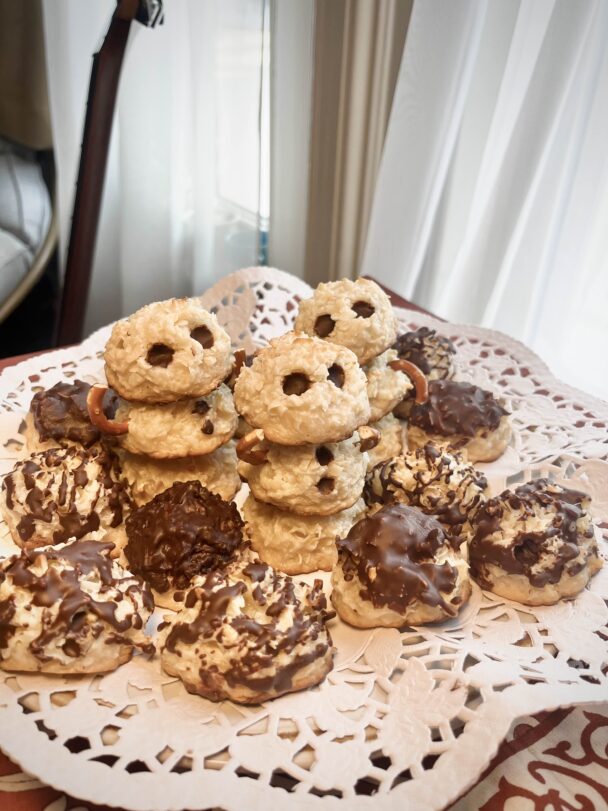
    “Snow-conut” cookies are the delicious product of my child-like wonder and cabin fever brought on by the past week’s winter storm. My Arizonan hometown has not seen snow since the last Ice Age as far as I can tell, so making these macaroons was a sweet way to spend my first real snow day. What other treat becomes a snowman so naturally? Baked with mostly pantry staples, the recipe for these fashionable fellows is quite simple, which is a real plus when the weather makes a trip to the grocery store nearly impossible. What makes these macaroons exceptionally approachable is tempering chocolate via the “quick and dirty” microwave method and replacing egg whites with sweetened condensed milk to bind the coconut flakes. I personally find that stacking up snowmen adds a charming touch to the whole business, but any presentation of your treats will taste just as good. 

    c/o Hope Cognata

    Ingredients (makes about 20 macaroons):

    • 14 ounce bag or 5 and 1/3 cups sweetened shredded coconut
    • 2/3 cups all-purpose flour
    • 1/4 teaspoons salt
    • 14 ounce can or 1 and 1/4 cups sweetened condensed milk
    • 2 teaspoons vanilla extract
    • 1 bar dark chocolate, ideally more than 100 grams and 60–70% cocoa
      • Chocolate chips have added stabilizers and often too little cocoa butter to temper
      • Melting less than 100 grams of chocolate makes it easier to scorch
      • A 70% cocoa chocolate bar is roughly 70% cocoa solids and 30% cocoa butter; chocolate with less cocoa butter easily over-thickens when tempered
    • A handful of pretzels or pretzel sticks (if you are making snowmen)

    Instructions:

    1. Preheat oven to 350 degrees Fahrenheit; empty shredded coconut into a large mixing bowl. Break up any clumps of coconut, then add flour and salt. Mix thoroughly. 
    2. Pour sweetened condensed milk and vanilla extract into another large mixing bowl. Stir until combined.
    3. Add shredded coconut to sweetened condensed milk mixture in thirds, stirring thoroughly and breaking up clumps of dry ingredients after each addition. The macaroon batter should be moist and able to hold its shape on the spatula. 
    4. Line a large baking sheet with parchment paper (the macaroons will stick horribly without it). Scoop one inch– to two inch–wide macaroons onto the prepared baking sheet with a small ice cream scoop, leaving about an inch of space between the cookies. You can still have neat spheres without an ice cream scoop by rolling the batter with your hands, but this method is quite messy. 
    5. Bake for eight to ten minutes before rotating baking sheet. Bake for another eight to ten minutes until the tops of the macaroons have toasted and there is a golden-brown ring around the base of each cookie. 
    6. Remove baking sheet from oven; transfer macaroons to a plate or cooling rack. 
    7. While the macaroons cool, you can temper your chocolate to decorate the cookies. To help the chocolate bar melt smoothly and reduce risk of scorching, cut it into small pieces. 
    8. Put two thirds of the chopped chocolate into a microwave-safe bowl. Melt for one minute at 50% power, then remove and stir. Repeat until fully melted. If your chocolate hardens at any point, reheat for 30 seconds at 50% power. 
    9. Add the other third of the chopped chocolate to the melted chocolate about a spoonful at a time, stirring after each addition. Let the chocolate pieces melt before adding more, reheating if necessary. 
    10. The chocolate should thicken and become smooth and shiny as you combine the last third. Once it is fully incorporated, stir for an additional minute so it can cool slightly. 
    11. Set aside three macaroons for each snowman you want to make. Dip the remainder of the room-temperature macaroons into the chocolate, shaking off excess before placing them back on the plate or cooling rack to dry. You can also drizzle chocolate over the macaroons with a fork or chopsticks.
    12. To make snowmen, use a chopstick to create two indentations for eyes on the top cookie and two indentations for buttons on the middle cookie. Press two pretzel pieces into the sides of the middle cookie for the snowman’s arms. Flood the divots for the eyes and buttons with melted chocolate using the tip of a chopstick. Assemble the snowmen once the chocolate dries, using toothpicks or small dollops of melted chocolate to hold the stacks together. 
    13. Enjoy!

    Hope Cognata can be reached at hcognata@wesleyan.edu.

  • Can You Bake the Perfect Pie? The Perfect Crust? Chill the Dough, Relax, and Just Add Vodka

    Can You Bake the Perfect Pie? The Perfect Crust? Chill the Dough, Relax, and Just Add Vodka

    c/o Katherine Hernandez

    Growing up, my family’s fall dessert tradition was America’s favorite duo: Costco’s hefty Kirkland Signature Pumpkin and Apple Pies. Something about that consistent, mass-produced flavor and undeniably soggy bottom will always have a special place in my heart. But after one too many apple-picking trips last fall, it felt like the right time to finally try my hand at a homemade version of this classic holiday dessert.

    Before executing any new dessert or dish, I will scour the internet to ensure I am properly educated and will obsess a bit over the tiny details that supposedly make or break a recipe. After all, baking is a science. What I quickly learned in my pie investigation is that using pre-made pie crust is the culinary equivalent of giving up and using shortening instead of butter is the gravest sin one could commit against the most hallowed pie gods who watch over us every holiday season. A truly great pie is not built on filling alone. That part is personal and largely intuitive. So I’ll let you in on a little secret. The real key to a killer pie is one thing people overlook every time: the crust.

    A good pie crust, I discovered, is not supposed to be soggy…at all. A great one stays crisp even on the bottom, boasting flaky layers almost like those of a croissant. Think less pale, Play-Doh-y shortbread and more golden, shattering bite, even after days sitting in the fridge. So, sorry, Costco—yours do not make the cut, but for $5.99, I’ll be a bit more forgiving. 

    To achieve a truly great crust, it is essential to keep your dough as cold and dry as humanly possible while working it. (Yes, even if that means sticking it in the freezer mid-recipe because your kitchen is too warm.) Now, you can use a food processor for pie dough, but I recommend against it. It tends to pulverize the butter too much, and those visible hunks of ice-cold butter are what create a magically laminated texture. When the butter melts in the oven, it releases steam and forms layers, and that’s the whole secret! The difference between a Pillsbury crust and a bakery-level one is not some mysterious ingredient, but rather relentless attention to how your butter, flour, and ice-cold water combine.

    With a little care, you can turn a humble holiday staple into something people actually talk about all year. I promise that once you make your own pie crust, you will never go back!

    Below is my go-to recipe, and the same one I used just this week to make an apple pie for Thanksgiving. The most distinctive feature is the addition of vodka to the ice water (don’t worry, it fully cooks off). Alcohol moistens the dough without activating the gluten in the flour, which results in an extra-tender, flaky crust.

    Kat’s Foolproof Pie Crust

    Yields two pie layers—enough for two open-faced pies or one double-crust pie.

    Ingredients:

    • 3 and 3/4 cups all-purpose flour
    • 1 tsp kosher salt
    • 1–3 tbsp sugar (depending on taste, you can skip for savory pies)
    • 1 and 1/2 cups (3 sticks) good-quality unsalted butter, frozen and roughly chopped.
    • 1/2 cup ice water mixed with 1/2 cup vodka 

    Instructions:

    1. In a large bowl, whisk together flour, sugar, and salt.
    2. Add the cold, chopped butter to the dry mix. Using your fingers, rub the butter into the flour until roughly incorporated. You want visible chunks rather than a smooth mixture.
    3. Slowly add the ice water and vodka mixture, mixing gently until just combined. You likely will not use all of the liquid. The dough should be just moist enough to hold together when pressed, but still feel dry.
    4. Shape the dough into a rectangle and cut it into thirds. Stack the pieces on top of each other, press them together, and reshape into a rectangle. Repeat this laminating step one or two more times to create flaky layers.
    5. Divide the dough into two pieces and shape into rough disks (this will make rolling it out easier). Wrap tightly in plastic wrap and freeze for at least 30 minutes to re-chill the butter and allow the dough to rehydrate.
    6. When ready to use, let the dough defrost for about one hour before rolling it out. It can be stored in the freezer for months for any future pie emergency.

    Notes: If you notice the butter starting to melt too much, let the dough sit in the fridge for about 10 minutes and take a quick break.

    Pie is truly one of my favorite foods because it is one of those rare desserts that somehow works for everyone. It can be sweet or savory, fruity or custardy, delicate or indulgent. My mom, for example, avoids desserts that are too sweet, so I was able to make a pie she loved by tweaking my crust to be buttery and crisp rather than sugary and by using her favorite Granny Smith apples for a tart filling with just a touch of sweetness. This year, I even used the spare pie dough to cut out tiny leaves and a turkey to top the lattice—the pie looked as festive as it tasted. While the question of the perfect pie will always be up for debate, what can come down to a science is the perfect pie crust. All it takes is good butter, proper lamination, and a stubborn commitment to keeping everything aggressively cold.

    Katherine Hernandez is a member of the class of 2028 and can be reached at khernandez@wesleyan.edu.

  • The Quiet Brilliance of Olive Oil Cake

    The first time I made an olive oil cake, I accidentally turned the oven off. After it spent 40 minutes languishing in a lukewarm oven, I thought I’d save myself the embarrassment and quietly retire it from our Thanksgiving menu that year. Perhaps it was the holiday spirit in the air, but, much to my surprise, the cake didn’t merely turn out edible. It was perfectly golden, crisp, and appallingly delicious, earning the status as everyone’s favorite dessert that night—even more so than the Nutella pizza I had spent 30 minutes meticulously decorating.

    Olive oil cakes, like all of the best recipes, can be modified according to your flavor palate or the season in which they’re made, though the most common variations are typically citrus-focused—a hallmark of their Mediterranean origins. 

    Much of the cake’s elegance lies in its simplicity. No decoration is required beyond a simple powdered sugar dusting or a rustic layer of frosting. Though it may look like an attempt to bake banana bread in a cake pan, it carries subtle notes of citrus, the herbaceous aroma of olive oil, and, of course, a perfectly crispy exterior. All you need to be impressive is a good quality olive oil, and, because of all the moisture in the batter, there’s hardly any chance of overbaking drying out the cake. Even for the most hopeless baker, it would be an achievement to truly mess up this one-bowl dessert. 

    And, if that’s not convincing enough for you, olive oil cakes will always taste better the next day! Utilizing olive oil as the primary fat in place of something like butter creates both a unique, subtle fruity flavor and an exceptionally tender crumble that will stay fresh for days. Thus, they are also the perfect dessert to prepare in advance—and if you somehow have leftovers, re-toast them like slices of bread and you’ll be left with an extra-crispy sweet treat that smells like citrus and sunlight!

    If you’re on the hunt for a dessert to impress your roommates, a new Thanksgiving dish, or a go-to recipe for when you’re in a pinch, an olive oil cake is your answer! The cakes are incredibly adaptable; you can fit them into any holiday season array—whether it’s pumpkin spice and apple cinnamon come sweater weather, or cranberry mint as you’re decking the halls. 

    Personally, this past Easter, I did not budget enough time to spend six hours prepping a perfect pie, and following some searching in my family’s herb garden, I landed on a perfect rosemary sugar citrus olive oil cake.

    Kat’s Take on a Rosemary Citrus Olive Oil Cake

    (Modeled after NYC’s Maialino’s Famous Recipe)

    I now refuse to spend $14 for a singular slice, but theirs is the best!

    Ingredients

    • 1 cup high-quality olive oil
    • 3 eggs (or your preferred substitute: my favorite is applesauce!)
    • 1 ½ cups of all-purpose flour
    • ½ cup almond flour (*note: if you want the cake to be gluten-free, feel free to substitute all-purpose flour with almond. I do a partial sub here for flavor. Almond flour can be denser and more absorbent, so the final cake may have a slightly different texture, or require minor adjustments like adding a little extra liquid to keep it moist, but generally this tends to be a very gluten-free friendly recipe!)
    • 1 teaspoon kosher salt
    • 1 teaspoon baking powder
    • 1/2 teaspoon baking soda
    • 1 cup white/granulated sugar
    • 2 tablespoons fresh, finely chopped rosemary
    • 1 and 1/2 tablespoons grated orange/lemon zest
    • 1/4 cup fresh orange/lemon juice
    • 3 tablespoons amaretto (optional, but it is the best Italian liquor for baking ever!)

    Kat’s Note: Almond flour adds a nutty depth and makes this recipe gluten-free-friendly if you do a total substitution, though it can slightly change the texture. Add a splash of extra liquid if needed!

    Directions

    Preheat your oven to 375 degrees Fahrenheit.

    Line a 9-inch baking pan with parchment paper, spray it with cooking spray; set this aside. 

    Add about 2-3 tablespoons of sugar to a small bowl with freshly chopped rosemary; rub together using your fingers—this will release the rosemary oil and essence, giving you an aromatic rosemary sugar!

    In another bowl, beat eggs and remaining sugar until mixture is foamy and pale yellow. 

    Slowly add remaining wet ingredients (olive oil, eggs, orange/lemon zest and juice, and amaretto) into bowl, whisk.

    Add rosemary sugar to the batter and whisk until combined. 

    In a separate bowl, whisk together dry ingredients (flour, sugar, salt, and baking powder) until combined.

    Sift the dry mix over the wet mix, gently fold together until combined. Be careful not to overmix.

    Add any mix-ins, or keep it simple!

    Pour the mixture into prepared pan. Tap the pan gently to pop any air bubbles. Set carefully in oven and bake for 35–45 minutes. A finished cake will be golden brown. You can test by inserting a skewer to see if it comes out clean!

    Let cake rest briefly in pan, then run knife along the edge, flip it onto the rack, let it cool completely.

    Once cake is fully cooled, add toppings! If desired, dust cake with powdered sugar; garnish with rosemary and citrus zest!

    Olive oil cake is forgiving, so feel free to add your own spin! For example: swapping in a bit of brown sugar creates a deeper, caramelized flavor, while adjusting the olive oil changes the richness of the crumb. Mix-ins can range from freeze-dried fruit to nuts and spices, including cinnamon, cardamom, or pumpkin spice. My personal favorite adjustments are to substitute part of the all-purpose flour for almond flour and to always add a splash of Italian amaretto!

    Katherine Hernandez can be reached at khernandez@wesleyan.edu.

  • The Art of the Chocolate Chip Cookie!

    What could possibly be a better way to spend the summer than learning way too much about American culture? That is exactly why I spent this past summer researching the intricacies of the best thing to come out of this great nation—the chocolate chip cookie.

    And no, I am not referring to the Chips Ahoy! of the world, or what I think is an abomination of this earth, Crumbl Cookies, but instead to the Cadillacs of the cookie scene. Despite its historical ties to the black-and-white cookie, New York City has recently become the epicenter of the chocolate chip cookie scene. Levain, La Mercerie, Culture Espresso, From Lucie, Chip City, and Maman are the Guccis and Louis Vuittons of the cookie world. Of course, it was my duty to try each and every one of them in this incredibly erudite research journey. 

    Amidst the garnishes of flaky sea salt and an entrancing toffee aura of brown butter, I realized two things. First: the endeavor to crown a singular chocolate chip cookie as “perfect” is utterly impossible, because while I might love the bitter notes of a 65% dark chocolate chopped bar, some people would die on the hill that a chocolate chip cookie should be made using actual chocolate chips. My second discovery, after spending my summer weekends coursing around New York City taste testing cookies, was that I am completely capable of making an amazing chocolate chip cookie myself. Thus, my chocolate chip cookie master document was born, and I am here to share the findings of my research, so you may also have every tip and trick you need. Instead of a recipe for the “perfect chocolate chip cookie,” I’m offering the information necessary to create a personalized quintessential cookie.

    Oversimplified: A chocolate chip cookie is made up of fat, sugar, binding agent (eggs), leavening agent(s), flour, and add-ins. The final product will depend on how you adjust the ratios, temperatures, and additional ingredients.

    Ratios: Perhaps the most important quality of a chocolate chip cookie is its texture, which depends largely on the ratio of fat to flour. Take your baseline recipe and, for a cookie reminiscent of Levain, with a cakey and almost scone-like texture, add some extra flour. (Bonus points if you include a high-protein flour like a bread or whole wheat one!) On the other hand, if you want more of a thin, crispy cookie, use a larger quantity of fat in your recipe. Without a strong structure to hold the shape, it will spread more.

    Quick mini-tip: Add an extra egg yolk or a couple tablespoons of heavy cream for a chewier cookie!

    Another aspect affecting the overall consistency of the cookie’s crumb is the ratio of the leavening agents responsible for the rise of the cookies: baking soda and baking powder. Baking soda, or sodium bicarbonate, is a leavening agent which can only be activated in the presence of an acidic ingredient such as brown sugar or honey. When used for cookies, baking soda delays the setting process during baking, allowing the cookies to spread more, and its presence encourages and speeds up the Maillard reaction, producing more browned cookies. In short, baking soda will give a chewier, denser, thinner, and darker cookie. Baking powder, on the other hand, is a combination of baking soda and an acidifying agent that activates this rise. Using more baking powder will give the cookie a more emphatic rise—almost a cakier texture. In cookie dough, some ingredients are acidic and others aren’t. Most recipes will call for both baking soda and baking powder so the cookies rise properly and completely.

    Of course, it is important to note that factors like chewiness, spread, and rise are all equally influenced by the aforementioned ratios, as well as the methods by which they are treated. I would consider baking soda and baking powder as supporting characters in the tale of chocolate chip cookies, the main ones being the ingredients, temperatures, and mixing processes.

    Temperatures: Cookie doughs made with identical ingredients and methodology can still turn out dramatically different depending on the temperature at which they’re baked. A good baseline temperature is about 350 degrees Fahrenheit. Exceeding it will shorten the baking time and lead to a thicker and gooier cookie, whereas lowering it will require a longer bake time, resulting in a more spread out, crispy cookie. 

    Another key step is to freeze your dough before baking. Roll into balls and freeze for at least an hour. The longer you freeze, the better. This will not only result in a thicker and chewier texture (it solidifies the fats in the dough, which prevents the cookies from spreading too much), but will also allow the actual flavors to intensify—almost like marinating meat! Not to mention, it’s very convenient to take a batch of pre-prepared dough from the fridge and throw it in the oven whenever you have the urge for a freshly baked chocolate chip cookie…

    Quick tip: The temperatures of both the ingredients and the oven can have major impacts. Using melted butter will lead to a richer, gooier cookie with a stronger toffee flavor, and using softened butter in a more emulsified state will allow you to cream the sugar and butter, adding air and leading to a fluffier texture.

    As you can tell, the recipe for a simple chocolate chip cookie is complicated enough, but don’t let that stop you from making it even more complicated with some unique mix-ins. Here are some ideas for how you can do exactly that:

    Cream of tartar: If you want an extra chewy cookie, cream of tartar prevents the sugar from crystallizing, leaving you with a less crispy, but ultra-soft cookie (sort of like the red Chips Ahoy!).

    Miso: If you’ve been following baking on Instagram Reels, you have likely seen at least one miso recipe. When used in a chocolate chip cookie, its saltiness and umami balance out the sweetness with a uniquely earthy flavor that plain salt lacks.

    Pumpkin purée: ’Tis the season! Pumpkin pie spice in a buttery chocolate chip cookie is what my fall, personally, is all about.

    Olive oil: Both heart-healthy and vegan! If you’ve ever had an Italian olive oil cake, this is a similar twist on a chocolate chip cookie. You can take it one step further by incorporating some freshly grated orange zest to flavor the cookie dough!

    Applesauce: The superior egg replacement in a chocolate chip cookie. One could argue that it actually produces a better texture than eggs.

    Espresso powder: A personal favorite—it’s no secret that chocolate and coffee bring out the best in one another, and including it in your dough will really highlight the chocolate notes in the cookie!

    Vanilla extract: There’s no such thing as too much vanilla extract. In a chocolate chip cookie recipe, it is the cherry on top of an already intoxicating aroma! This also applies to any other extract you might like, such as almond or maple—or even some Italian Amaretto if you’re feeling extra adventurous!

    Now that I have given you all a synopsis of my life’s work—at least during this past year—I must confess: I did not exhibit a predisposition towards chocolate chip cookies in my childhood. My signature cookie was a snickerdoodle. This may come as a shock to many, but I actually used to not like chocolate chip cookies. I had thought that they were quite boring, and simply didn’t understand the appeal of chocolate being in a cookie. Now, I think that “chocolate chip cookie” has genuinely been my most stated phrase this past year. To answer the question that all my friends visiting New York City have asked me—“Kat, where can I find your favorite chocolate chip cookie in New York City?”—the answer is Culture Espresso! Their cookies have puddles of perfectly distributed, perfectly bittersweet chocolate. #TheyDefinitelyUseChoppedChocolate

    Now, if you hate sea salt, and are a die-hard chocolate chip fan, you will not like this cookie. Alas, that is why I say to you all who have no semblance of baking skills: the world of chocolate chip cookies is still open for you to hyperfixate on. Let me leave you with one tip—don’t waste your time with Crumbl Cookies. The best cookies you find will be from an independent bakery with its own quirk that you will fall in love with (although an Insomnia cookie does not sound half bad at all…). 
    Kat Hernandez can be reached at khernandez@wesleyan.edu.

  • A New Haven Pizza Roundup

    A New Haven Pizza Roundup

    c_o Sally PizzaNew Haven pizza, though less famous than New York-style or Chicago deep dish, is truly the best. This “apizza” is characterized by a thin crust—a perfect combination of chewy yet crisp—often accompanied by a sweet tomato sauce, fresh tomatoes, or even clams! Though Frank Pepe Pizzeria Napoletana, AKA Pepe’s, is credited with starting New Haven pizza, Sally’s Apizza and Modern Apizza are acknowledged to be the other two members of a holy trinity of pizza parlors. There’s even a few other contenders, like the trendy restaurant that goes by the name of BAR. According to a surprisingly detailed Wikipedia entry, Frank Sinatra preferred Sally’s, while Ronald Reagan preferred Pepe’s. 

    My family has always been a Pepe’s family. My mom grew up in New Haven and would take any excuse to bring my family to the location in the Chestnut Hill mall, just 10 minutes from where I grew up. Every time I visited my grandparents in New Haven, we always made a calzone stop at Modern, which is the only one of the aforementioned pizza parlors to offer these pockets of delicious goodness. I have always had a special place in my heart for Pepe’s, so with the help of my editor, Lewis Woloch ’24, I set out to determine which pizza reigns supreme in New Haven (since I do not agree with Ronald Reagan in many other matters). 

    Issie’s Reviews

    Sally’s Apizza:

    One Saturday evening in April, I rallied three of my friends to trek to Wooster Square—New Haven’s Little Italy—to join me on my quest to declare a New Haven apizza champion. After waiting outside in line for an hour and a half, we finally got seated at a booth in Sally’s Apizza. There was a cozy atmosphere: Various pictures and newspaper articles littered the walls and there were a few colorful lamps overhead. We waited around 30 minutes for our pizza to come out, piping hot. We ordered the garden special pie (fresh tomato, zucchini, onion, and basil with a mozzarella base) and a choose-your-own with sausage, onion, and mushrooms on a classic tomato base. While my ravenous appetite may have factored into some bias, Sally’s pizza was incontestably delicious. The tomato sauce was perfectly sweet and savory, the fresh zucchini and tomatoes added freshness to the cheesy base, the onions were crunchy, and the crust was perfect. I ate these hot pizzas so fast the roof of my mouth was burned for a week. You know the battle was worth it when you have the scars to prove it.  

    Pepe’s Pizza:

    The next weekend, I took a trip to Pepe’s to see if it could top my Sally’s experience. Though I opted for takeout to avoid the line, the joy I experienced was on par. I ordered the sausage, onion, and mushroom pizza with a mozzarella base. The crust was tangy in the best way, and the pizza’s excellence was fortified by the perfect caramelization of the onions and the umami depth of the mushrooms. Overall, an incredible experience. 

    At the end of the day, these pizzas were matched in quality and flavor, so I’d base my decision on whichever has the shortest line! I’d recommend bringing your 3-4 friends and making a day out of it. Get one tomato-base pie and one fresh pie with a white base to really get the most out of your experience. 


    Lewis’ Reviews

    Modern Apizza:

    Sadly, while I planned to go to this acclaimed spot, the immense crowds prompted my father and me to head back to Brooklyn instead of sticking around for a late dinner. Based on the one time I went here three years ago, during my freshman year, I can semi-confidently say that the calzones are great and the pizza is even better, which adheres to Issie’s family’s opinion too. 

    BAR:

    Compared to the famous trio of Sally’s, Pepe’s, and Modern, BAR, a brick oven pizza joint right near Yale’s campus, doesn’t quite have the same history or hype. However, their pies, as well as the restaurant space itself, emanate new-age vibes, vying for a place among the pizza greats of New Haven. 

    While the loud, boisterous atmosphere reminded me of a recent trip to Frank Pepe’s, BAR attempts to set themselves apart through an appeal to youth culture. Their website advertises the “Bru Room,” in addition to a dance club open on Fridays and Saturdays. While my specific visit was alongside a large group of Yale professors (don’t ask why), most of the crowd was on the younger side. When I asked for a coffee, the waiter gleefully informed me that they only serve alcoholic drinks and soda. While waiting for the pies to arrive I began to worry: Did the name reflect an alcohol-first, pizza-second mentality? Did the restaurant place an importance on any sort of Italian heritage?

    The arriving fleet of enormous pies soon convinced me otherwise. The large group I was with ordered a variety of pizzas with a wide range of toppings: eggplant, tomato and basil, bacon, and something that tasted suspiciously like mashed potato. Doing some research after the fact, I realized that BAR allows for full customer customization of their pizzas: They actually don’t have any concoctions of their own and just provide the base pies and an illustrious list of toppings on their online menu, which explains why some of the pizzas our party was eating were a little strange. Overall, I appreciated the crispy eggplant combined with the sweet and savory sauce, and the house salad was surprisingly nuanced and delicious. Yet BAR itself was hard for me to conceptualize as a true, pizza-driven establishment, and for that reason, I may stick to the usual suspects the next time I’m in New Haven.

    Isabel Kapner can be reached at ikapner@wesleyan.edu.

    Lewis Woloch can be reached at lwoloch@wesleyan.edu.

  • Endorsing Skyline Chili

    c/o Kroger
    c/o Kroger

    When I learned of the negative Skyline Chili experience of Assistant Food Editor Blake Klein ’26, I was dismayed. I would like to assure readers of The Argus that Skyline is far better than that. Having spent every Christmas visiting family in Cincinnati, I know Skyline Chili to be one of the most excellent foods ever created.

    Based on the word “chili,” amateur Skyline customers typically expect a chunky, spicy, tomato-based stew. But it’s far subtler than that. Skyline Chili (or Cincinnati chili, if you want to call a Pop-Tart a toaster pastry) is a meat sauce with a delicious medley of mild spices, including chili powder, cumin, Worcestershire sauce, cloves, and cinnamon. It is perfectly complemented by cheddar cheese and is served over spaghetti or hot dogs.

    The flavor profile comes mostly from Greece: According to chili scholar Dann Woellert, the dish came about after an influx of immigrants to Cincinnati in the early 1900s, when the collapse of the Ottoman Empire was causing political strife in Macedonia. After brothers Tom and John Kiradjieff founded the Empress Chili Parlor in the 1920s, many other immigrants went on to start their own chili spots, each with a distinct take on the dish.

    Cincinnati chili can be served over spaghetti, thus creating a dish known as a Way, or over hot dogs. The nomenclature is pretty simple for 3-Ways, 4-Ways, and 5-Ways: Chili, cheese, and spaghetti are in each of those options, while onions and beans are the elective ingredients. However, it takes a seasoned chili customer to navigate the names of chili-topped hot dogs. A plain hot dog with chili is classified as a chili wiener, while the addition of mustard makes it a Coney. Cheese can be requested with either of these. And by default, a Coney has onion and a chili wiener does not, but you can request otherwise.

    In short, ordering a “cheese Coney, no onion” is normal, but “cheese Coney, no mustard” would be gibberish and the speaker would be asked to leave the premises permanently. (They would actually just repeat your order with the correct terminology, like a Starbucks barista confirming a small coffee as “tall.”)

    Many of the critiques against Skyline refer to its disconcerting nutritional profile. For example, 40% of the calories in a 3-Way come from shredded cheese. However, that pasta-to-cheese ratio is necessary as it creates the best possible flavor. It can be the delicious part of a complete day of meals—individuals should decide for themselves exactly how many heads of cauliflower they need to counteract a Coney. Skyline would never be so overbearing as to make personal health decisions for you, even though you are free to ask them for the Lite 3-Way with a decreased (suboptimal) amount of cheese.

    Skyline’s generous spirit and dietary inclusivity don’t stop there. Vegetarians can enjoy a black-bean-and-rice version of the 3-Way, or an innovative meatless Chilito. Vegans, I presume, would delight in the Cheddar Potato (a side dish that contains no chili) after requesting it without cheddar.

    I also consider Skyline oyster crackers to be a national treasure. How many restaurants have a signature carbohydrate that serves as both an appetizer and a topping for your main dish? They can be the perfect entree for a new family member at about 18 months of age—an important rite of passage for a future customer. And these crackers are sold by the box at grocery stores for soup and snacking, evoking fond memories of chili parlors for all who have been lucky enough to visit one.

    A chili parlor has the perfect combination of ambience, regional pride, and room to seat a clamoring horde of family and friends. And Skyline, like most things, is improved by sitting around a table with people you love.

    Anne Kiely can be reached at afkiely@wesleyan.edu

  • Turkey Chive Meatballs in Spring Broth: Cooking With Chef G

    Turkey Chive Meatballs in Spring Broth: Cooking With Chef G

    c/o Gemmarosa Ryan, Food Editor
    c/o Gemmarosa Ryan, Food Editor

    Only recently have I come around to the radish. It’s fairly polarizing as far as vegetables are concerned. There are those who go to sleep dreaming of fresh radishes and butter, and those who scorn the very sight of them. I previously belonged to the latter camp, only tolerating radishes if pickled or preserved, unenthusiastic about the raw peppery bite. But upon learning that radishes taste completely different when cooked, I decided to test my luck and poach them in some broth. The result is somewhat miraculous: the nose-clearing effect dissipates, and the pink parcels take on a subtle yet complex flavor, something between a potato and, well, a radish.

    What else is transformed by broth? Meatballs make a serious second contender. Though I rarely ever gravitate towards ground turkey (too lean, pretty flavorless), I imagined its subtlety would lend itself well to a miso- and pea-filled broth: a good protein to let the brightness of spring produce take center stage. This broth is perfect for the transitional weather. It’s the comfort you need as you wait for May flowers to sprout from April showers. 

    Ingredients

    Serves 3–4

    Meatballs:

    • 1 pound ground turkey meat (pork would also work)
    • 1/2 cup chopped chives 
    • 1 egg
    • 1/3 cup panko bread crumbs 
    • 3/4 teaspoon salt
    • 3/4 teaspoon black pepper 
    • 1 teaspoon garlic powder 

    Broth:

    • 3 cups broth of choice (chicken, vegetable, dashi)
    • 2 tablespoons sesame oil 
    • 1 cup frozen or fresh peas
    • 2 bunches radishes (stems removed)
    • 1 bunch pea shoots (if you don’t have these on hand, don’t worry. The broth is delicious without them too)
    • 1 tablespoon fish sauce
    • 1 tablespoon miso paste 
    • 1 tablespoon coconut aminos 
    • 1 tablespoon soy sauce
    • Black pepper and salt, to taste

    Instructions 

    1. Heat pot over medium heat. Add sesame oil. 
    2. When oil is hot, add the turkey in batches, using a small spoon to form chunks. Brown the turkey meat, 3–4 minutes. 
    3. After all the turkey has been browned, deglaze the pan with broth, scraping up the bits of fond on the pan. 
    4. Bring the broth to a boil, then reduce to a simmer. 
    5. Add radishes and miso paste. Cook for 10 minutes. 
    6. Add turkey back in and cook for another 2–3 minutes. 
    7. Add frozen peas and cook for another 1–2 minutes. 
    8. Finish off with fish sauce, coconut aminos, and soy sauce. 
    9. Top with more fresh chives and pea shoots, and serve with a side of rice. 

    Gemmarosa Ryan can be reached at gryan@wesleyan.edu

  • A Modern Take on Matzo Ball Soup

    A Modern Take on Matzo Ball Soup

    c/o Milly Berman
    c/o Milly Berman

    Passover is this week, and for me, that means two things: I am going to be hosting a Seder, and I am going to be making absurd amounts of matzo ball soup. Matzo balls are unlike any other food I’ve ever tasted. They’re sometimes fluffy, sometimes dense, salty, bready, eggy, springy, and absurdly delicious.  

    This year, I broke the unspoken rule of my family that matzo balls are a Passover food only, and got super into making matzo ball soup as a weeknight dinner. It’s perfect: The warm, comforting soup comes together in mere minutes, and the soft, bouncy balls fill you up more than most brothy soups would. Because I was cooking it all through the fall and winter, I experimented with lots of different flavors, using the standard matzo ball as a jumping-off point.

    This recipe is the best of all the versions I tested. My first innovation is that I make the broth slightly spicy by adding red chili flakes, which are toasted in oil to open up their flavor. For me, the spiciness adds so much warmth and comfort to this soup, drawing out the complex flavors of the broth and vegetables. 

    My second intervention is the addition of corn. Usually, matzo ball soup features onion, celery, and carrots as the flavor base. I always find those boiled-down carrots to be a total vibe-killer.  So, instead, I add sweetness in the form of early summer corn, stirring it in right at the end to preserve its bouncy texture and fresh, juicy sweetness. The topping of delicate celery leaves and dill brings this recipe right to the precipice of spring, where it belongs.  

    Matzo Ball Soup

    Ingredients

    Serves 3–4

    • 1 package matzo meal (I prefer Streit’s or Not Your Mother’s, but any brand is fine. Just don’t get the unsalted type.)
    • Eggs (amount according to the matzo meal package instructions)
    • 1 large yellow onion
    • 5 stalks celery, plus leaves
    • 4 cloves garlic
    • 2 tablespoons olive oil, and however much oil the matzo meal calls for
    • 1 teaspoon salt (if using unsalted broth, double the amount)
    • 1 tablespoon red pepper flakes
    • 1 teaspoon garlic powder
    • 32 ounces vegetable or chicken broth
    • 1 cup corn kernels (frozen is fine, but fresh is best)
    • 1/4 cup dill, torn 

    Instructions

    1. Mix the matzo meal, eggs, oil, and water according to package directions. Rest the mixture in the fridge for 45 minutes to 1 hour.
    2. While resting, make the soup. Start by thinly slicing the onion, celery, and garlic. Set aside the celery leaves for later.
    3. Heat the olive oil in a large saucepan on medium heat. Add the onion, celery, and garlic, and sauté until translucent. Add the salt, red pepper flakes, and garlic powder, and toast for about 1 minute.
    4. Pour in all the vegetable broth, cover, and bring the soup to a rolling boil. 
    5. While waiting, wet your hands with water and shape the matzo mixture into 2-inch balls. These will grow into huge balls when cooked.
    6. Drop the balls into the boiling water and cover tightly. Lower the heat and simmer for at least 30 minutes (The balls should feel light and airy when lifted with a spoon).
    7. Add in the corn, and stir to combine. 
    8. Turn the heat off, and let the soup sit with the lid on for 5 minutes to cook the corn.
    9. Sprinkle on the beautiful torn dill and celery leaves, and serve!

    Milly Berman can be reached at mgberman@wesleyan.edu.

  • Fostering Community at the Wesleyan Jewish Community’s Shabbat Dinner

    As a resident of the Bayit, a program house for Jewish students on campus, I have become accustomed to the weekly Wesleyan Jewish Community (WJC) Shabbat service that attracts dozens of people. Occasionally, I walk in on Friday evening after the service (sorry for skipping them, Mom!) and see trays and trays of food out in a glorious display. No matter how many people attend, there always seems to be enough food for everyone. It’s an impressive feat. I decided to reach out to Talia Rodriguez ’24, a member of the WJC’s Executive Board, to learn more about this weekly dinner.

    The WJC is a pluralistic Jewish organization open to all students on campus. It organizes various campus events, including celebrations of major Jewish holidays and social gatherings to foster community. Rodriguez is the WJC’s cooking coordinator and has the daunting task of coordinating a Shabbat dinner for a huge group. Up to 35 people attend the weekly service. 

    While Rodriguez herself enjoys cooking, other members of the WJC or outside volunteers cook Shabbat dinner. Based on the recipes for the weekly dinner, Rodriguez puts together a shopping list and sends it to the Office for Religious and Spiritual Life. She has two tips for volunteers: prepare on Thursday night to streamline the cooking process on Friday, and make a dish that lends itself to feeding a large group. Each week’s dinner is different, with the meals ranging from a hearty lasagna with a salad to vegetarian bean chili with noodle kugel. While making a meal for such a large group is challenging, Rodriguez has mastered the art.

    “I could totally whip up a big meal in three hours,” Rodriguez said.

    Rodriguez herself is an avid chef, specializing in vegetarian food. She is of both Ashkenazi and Sephardic Jewish descent, so cooking represents her mixed heritage and enables her to express her identity. One particular dish she grew up eating was her grandmother’s Passover buñuelos. Buñuelos are fried dough fritters typically made with a risen yeast dough, although her family prepares them with matzo for Passover. Since starting college, Rodriguez has expanded her repertoire and enjoys cooking food from a variety of cultures, whether it’s bibimbap or matzo ball soup. Her proudest accomplishment is cooking a massive Mediterranean meal for Homecoming and Family Weekend in 2021, serving over 60 people.

    The weekly Shabbat dinners are central to the WJC’s close-knit community and allow everyone to bond over a shared love of food, regardless of religion. There are tables set up in the Bayit’s common room, and guests are encouraged to sit together and mingle. For Rodriguez and many others, cooking every week is a great way to give back to the WJC community, as well as meet new people through the universal language of food. She and many others have found a great opportunity to volunteer through these meals.

    “It’s more accessible,” Rodriguez told me. “You don’t have to know any Jewish prayers or the Torah like the back of your hand, [but] a lot of people know how to cook.”

    Although the WJC has had immense success in maintaining its weekly Shabbat dinner, Rodriguez expressed concerns about the future of the tradition. Since the cooking is done entirely by volunteers, she is unsure whether there will be enough people willing to lend their time in coming years. Ultimately, the program may have to move in a different direction. However, despite worries about continued participation, the WJC has successfully held other cooking events, including a challah baking class led by Eliana Bloomfield ’25.

    The WJC’s weekly dinners represent the power of commensality. Regardless of religious affiliation, cultural background, or personal identity, every Wesleyan student can bond over a shared meal. Rodriguez told me that this was her favorite part of cooking dinner, and that the community of the WJC in general has helped her in times of loneliness and hardship. 

    “Everybody’s gotta eat,” Rodriguez said.

    Blake Klein can be reached at bklein@wesleyan.edu.

  • Picking Your Pickles With Ava

    Picking Your Pickles With Ava

    c/o Ava Becker
    c/o Ava Becker

    In a world as divisive as ours, I find it easiest to categorize people into two types: pickle lovers and pickle haters. This article is for everyone who falls into the former category, or those who appreciate a tangy, crunchy and deliciously complex fermented cucumber at any time of the day. That being said, our world bombards us with endless choices when it comes to pickles. Have you ever walked into Weshop and felt overwhelmed by the various options available to you? Fear not, I am here to help. 

    I have now tasted all four brands of dill pickles available at our lovely campus grocery store, and will review them for you below. In terms of criteria, I am looking for a pickle with a strong crunch, a balance of both vinegar and salt, and a nice hint of dill, garlic, or some other spice. 

    I began this endeavor by opening up a fresh jar of Vlasic Kosher Dill Baby Wholes. I will say that I did not love this shape because it reminded me more of a cornichon than a dill pickle, but luckily all the other aspects of this kosher dill are in line with a well-created batch of pickles. At first bite, a lovely crunch rang in my ears, and I tasted an adequately vinegary tang. The flavor is not particularly interesting; no pieces of dill float in the jar, and there is no unique spice…but that is the beauty of this pickle. It is not interesting, but it is reliable. A classic Vlasic. For me, this jar gets an 8/10.

    Moving on to our next brand, Wickles Original Pickles, I could not have been more disappointed. I was hopeful about this jar. Wickles has a lovely dispersal of spicy red peppers and garlic, indicating a more flavorful creation than a basic kosher dill. The initial taste was one of the most upsetting flavors I could have imagined. The pickle was completely mushy, oddly sweet, and ultimately the sensation of this culinary experience would be best compared to eating a large spoonful of Heinz relish—but worse. To cite a fellow taster’s comments, “YUCK.” These were a definitive 0/10. Proceed with caution.

    The next in the array of pickles were Mt. Olive Kosher Dill Spears. I expected an experience similar to that of the Vlasic, and I was especially excited about the spear shape (one of my favorite pickle forms). Unfortunately, this was a highly mediocre pickle. With hardly any crunch, and a slightly weird aftertaste, these spears were edible but nothing to phone home about. They are acceptable. Would I be mad if they were served as a side to a burger or sandwich? No. Would I eat these on their own and enjoy it? Also no. Mt. Olive is a 3/10. 

    Last but certainly not least, we come to a uniquely trendy pickle. Enter: Grillo’s. They were by far the most expensive variety of pickles offered at Weshop, but arguably the most exciting. They come refrigerated, hinting at a freshness and artisanal prowess. To start with the positives, I think Grillo’s kosher dills have a fantastic crunch, and I love how the cucumber flavor still comes through more than the other available brands. It is easy to eat too many of these (although can one really eat too many pickles?). On the flip side, I do think they would be even better if they were slightly saltier. Despite their great dill and vinegar flavor, Grillo’s lack a traditional saltiness that I prefer in a kosher dill. Nonetheless, I give Grillo’s an almost perfect 9/10, and I do think they are worth the extra dining points.

    As all of you pickle lovers go forth in your culinary explorations, I hope this serves as a helpful guide for what is available to us in our lovely Weshop. 


    Ava Becker can be reached at abecker@wesleyan.edu.